So as discussed in my previous blog post '"Plain Terrain" Features: The Concept', the idea behind a 'Plain Terrain' feature is to be a 'half-way house' between just using a plain cloth and a full set of terrain boards to game on, hopefully getting at least some of the visual appeal that comes with using terrain boards, but at only a fraction of the requirement for storage space. Even if they don't work out I should at least have some nice boards to photo my figures on for this blog.
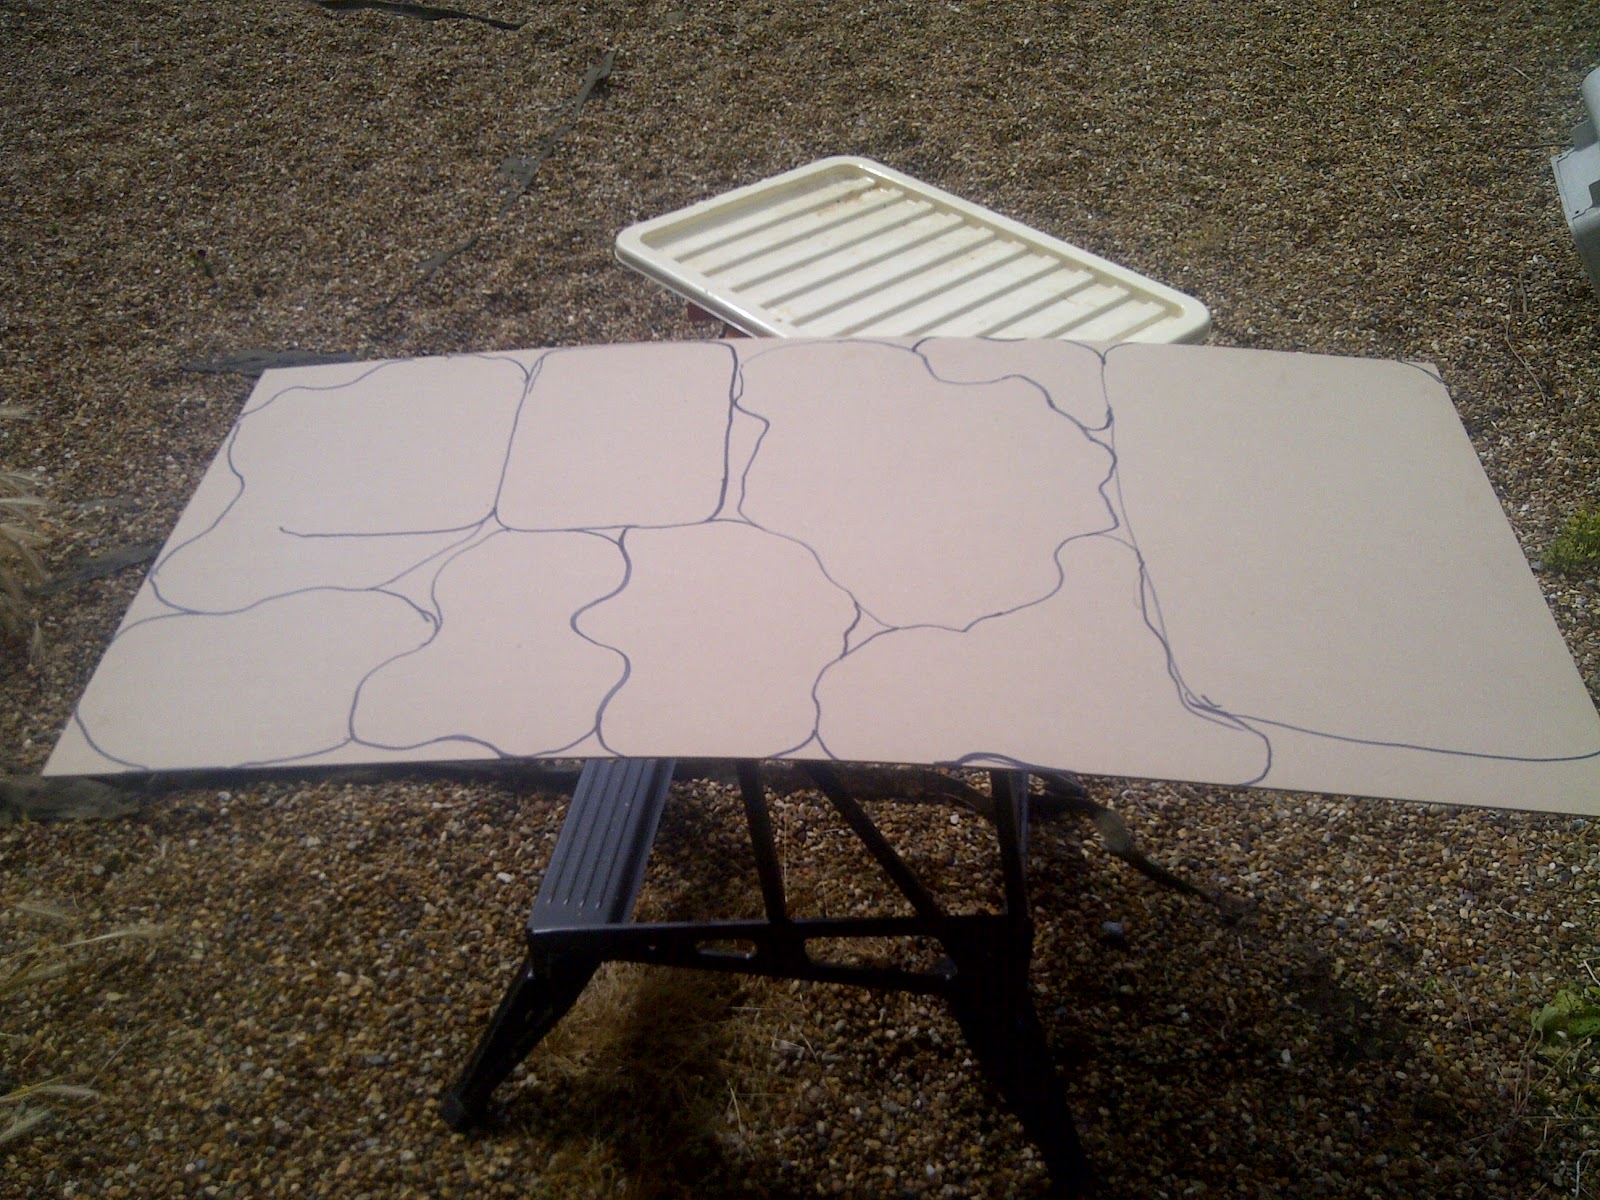
First up I've marked up my board, some 3mm MDF from Wickes. I've gone for one large rectangular field with rounded off corners, one smaller field (initially started marking up two, but changed my mind), and several irregular areas. I wanted to make sure they would all go in a large storage box, so used the lid to make sure none would be too big.
I popped on a unit of 28mm figures to check size/scale. I could have made them a bit bigger, but then I couldn't get them in a storage box, so not a bad compromise.
Changed my mind on some of the smaller sizes, when I saw this. Some I'll have to go with because they are the result of what's left, but I'll consolidate those two they are sitting on into one.
This is a 36 figure 20mm Napoleonic unit for scale. Looks the sort of size I wanted...
...10 minutes later and I've whipped my jigsaw out and cut them up. Some of the smaller scraps I'll use for actual terrain features - eg. jungle stands or for bases to mount 'rock piles' on...
...incidently this is the sand I use for basing and would recommend it. In fact, it took me a little bit of scouting out to find the 'right' sand. It's actually called 'builders ballast' and has lots of small stones in it. Its cheap (about a quid a bag) and I've been using this bag to base my figures and make terrain for about four years - it fact it's being carted through 3 house moves! The big advantage is that you get 'rough' sand. If you want finer sand you can sieve it, or just use the stuff at the bottom. Fine sand bought in DIY shops doesn't look as good on bases and is often a funny colour (eg. bright orange) so you have to paint it. You can paint this stuff, but it is an 'earthy' colour so you don't have to. It is generally 'wet' in the bag, so you have to dry batches out to use. I just do this by spreading out on a tray to dry in the sun on a warm sunny day. This is a large batch I dried out a couple of weeks ago:
You can see all the small stones in it. Some are a bit big but you just push them to one side.
Next on with the trusty PVC glue. The funny thing about PVA is the more you buy the cheaper it gets in a dramatic way. DIY shops and stationers like WH Smith charge ridiculous amounts of money for tiny amounts of this stuff, eg. £3.50 for 150ml (ie. close to £30 a litre). If you buy a 1 litre tub it could cost you £7-8. This 2 litre tub cost a tenner (ie. £5 a litre), but you can also get 4 litre plastic containers for only £14 (ie. about £2.50 a litre). As far as I can tell its all the same stuff! Madness! Just running out of this one. Next time, I think I'll go for the 4 litre size as I might be making some more terrain.
Once well plastered, I pour handfuls of sand over it. If I wanted a 'desert board' this would probably be all I had to do. I've got some different Gale Force 9 flocks and static grasses, so I might test out one of the more exotic ones on this one, such as 'Moorland' after maybe painting it a darker brown.
These are a sample of different ones I've knocked up so far. The small rectangular field at the back I've gone over and used a stick to put some 'plough-marks' on it. I'll see what it looks like when its dried. If it looks good I'll leave it, or maybe just paint it. If they end up looking a bit indistinct, I'll maybe sprinkle some lines of scatter on it to look like growing crops and make it more obvious. The big irregular board I'm going to try turning into 'rough pasture'. One of the things you find basing minitures is that with static grass in terms of effect, 'less is more', with small patches of scatter put on tiny blobs of glue looking much better than dense areas glued and covered. So I'll be testing out if that look will make a good-looking piece of 'plain terrain' on a larger scale. I also want to try out some as meadows, but I'm not sure that static grass is worthwhile, and might use try some green paint with a light green dry brushed over, leaving some patches of bare sand here and there.
The small scraps have been turned into 'rock stands', which use up the larger stones in the builders ballast. You can, of course, just scatter rocks on the table, but they are a pain to pick up at the end, so I find 'rock stands' more effective. I've done some on card, but they can look scruffy if the card curls, so I'm trying these on the more solid MDF. As well as 'dressing' a table, the rock stands can be useful terrain features in skirmish games, eg. Wild West or Colonial eg. North West Frontier, and also can be useful in marking 'crests' on hills, and improving the look of 'flat' hills, while like model trees being easy to move around if they get 'in the way' of moving a unit.
Unfortunately started to run out of PVA before I finished, but I'll see how the five boards I've done so far turn out, before buying some more and doing the rest.
The PVA can take up to a couple of days to really dry out, so I've put them in my workshop attic to dry before applying static. You can do this at the same time as sticking on the sand, but I've generally got better results applying it after, as it's easy to spill some and it is too much and looks messy, compared to the nice small 'clumps' you can get with tiny amounts of glue if you're patient.
I had thought that one board would give me enough pieces, but realise I might want to get a few different 'looks' for different games. I wiill get some of this by changing cloths - the boards like 'field' or the 'rough pasture' should have quite a different on a 'green' cloth to putting them on my 'desert' cloth. But also I think I'll probably want some more fields, maybe some 'desert' sand boards, a bit more meadow, maybe some 'moorland', maybe some paddy fields for Far Eastern games, and maybe something a bit more exotic ('Martian orange' or 'Lunar concrete grey'?) for Sci-Fi games. As long as they are fairly flat, I should get quite a few packed away in one large storage box.
UPDATE:
Today proved quite a good 'drying' day so was able to move to applying 'static grass' faster than expected. Here are the results, including a shot of the 'rough pasture' with (20mm) Napoleonic Skirmishers and (28mm) LotR Gondor Knights. The piece should look like a 'dry' piece of terrain on a green cloth, and a 'fertile' piece of ground on a sand desert cloth. Perfect for a bit of urban 'waste ground', 'worn' or 'over-grazed' clearing or Spanish hillside or Western chaparral. I think I might change my mind on experimenting with different effects on the other irregular boards. Three or four of these boards to throw down on a plain cloth should make the whole table look really goooodddd!!! If nothing else I should be able to take nicer looking pics of my figures with it!
Showing posts with label Terrain. Show all posts
Sunday, 10 June 2012
Wednesday, 6 June 2012
'Plain Terrain' features: The concept
A 'Plain Terrain Feature'? A 'Terrain Feature' that is 'Plain'? Now this might seem like a 'backwards' concept, but as an American lady I've just been working with says "Here's the thing."
Look at those glossy rulebooks like 'Black Powder', the 'WAB' or 'Lord of the Rings' (or any GW stuff), the 'Rapid Fire' books or the new 'War and Conquest' rules, and, if you are the average wargamer, you have a 'drool' reflex over the pictures.
Now those pictures have lots of very nice painted figures. Which is what we all aspire to. But, they also have some thing else, and putting together this blog and photographing my own miniatures, has really brought it home to me. These publications have photos that all have lovely terrain, but it isn't just any old terrain, nearly always the figures are set out on 'Terrain boards'.
------------------------------------------------------
Now carved, sculpted, flocked and 'teased' terrain boards are all very nice. They look gorgeous, all the best 'exhibition' games at shows use them, and so as I have just mentioned do the rulebook and wargames mag photos. There are, however, three major drawbacks with terrain boards, which are: SPACE, SPACE, and SPACE. Ok, so enough boards to cover a 2 foot square DBA board or even a 4 foot one, or even your basic table are not that many, but obviously you are going to want to have your 'carved out river' boards, too, and your hill boards, and our maybe mountain boards, too, and maybe your road boards... and your city boards...oh, and your desert boards, and your desert hills...and river...and maybe some marsh boards...what about your 'Mars' boards, and Martian hills...and snow boards...and "anyone for trenches?"...Now if you belong to a club with tons of storage space fine. If you have a spare barn, fine....but I once met a guy at a show who told me he had one of the biggest set of terrain boards going...and admitted the missus had said on numerous occasions "It's me or the terrain boards!". I saw him at the same show a year later. "A new set of terrain boards, again this year" I said. "Yes", he replied. "What's the missus got to say about that?" I asked. "Actually, I got divorced six months ago" he said....
...Now some wargamers might be happy to choose the terrain boards over the missus, but to be honest, much as I love my wargaming, that doesn't include me!
The fact is terrain boards are a right pain. I know a guy at the club who says he has a full set, but says it is too much trouble to get them out the attic for a game, unless its for a show.
------------------------------------------------
So what's the alternative? Well, its the other 'system' used week in and week out at wargames clubs for your average game, ie: chuck a cloth on the table and scatter 'terrain features' on it.
But, the short-comings of this system really came home to me when I saw some pictures of a game I myself put down at my local club. The cloth was a not unpleasant or unrealistic green felt, so OK a a proper static grass 'battle-mat' might have been a bit better, but the overall look was so dull and utilitarian, it just did not 'zing'...and all that effort which had gone into painting and colour washing, and highlighting and basing my figures just paled into insignificance on this vast expanse of plain coloured background.
To make the point this is a photo of a battle at my local club using figures painted by one of our best figure painters used in a game with a plain cloth and a few terrain features.
![]() |
| Reece's superbly painted armies...on a very ordinary looking table cloth!!! |
------------------------------------------------------------
Now, a while back I sat and really studied the pics in the 'Fire and Fury' rulebook. The table for these pics is actually a plain cloth or more probably blanket. But immense care has been taken to break up the plainess of the underlying cloth. Bits of cordurey for plowed fields, 'fake fur' for wheat fields, lots of those little fences made out of matchsticks beloved by ACW gamers, little stones scattered about. So at one time, I thought that might be the way to go, building up a little collection of corrugated card, scraps of carpet and some painted cork tile - all light and easy to carry and easily 'thrown down' to represent fields and the like (ie. 'plain terrain' in wargames parlance). Here's a shot I took, as it happens also of a table set up for an ACW wargame:
Barring the odd gap showing up in river sections etc. I think the photo looks pretty good, and its looks like a 'well-dressed' battlefield. The problem is, well, it LOOKS GOOD IN THE PHOTO, but it doesn't actually look so good in real life.
This partly comes across in the second photo above, which shows a less flattering view, where I the angle does not fool the eye as much. Edges curling up and so forth show up. This problem is even worse IN REAL LIFE. Because unfortunately when you are actually standing over the table, unfortunately a bit of corrugated card looks like well...a piece of corrugated card, a piece of carpet tile...like a piece of carpet tile...a bit of painted cork tile, like a bit of painted cork tile and so forth. With a crease or curl here or there it quickly looks pretty 'tatty' basically.
----------------------------------------------------------
Now the fact is, it is possible to make 'terrain features' which look much better than this. Wargamers do it all the time for hills, rivers, roads, marsh and so forth, using sand, sculpted foam, flock and scatters, and there are stacks of blogs out there showing off this sort of work. But they all tend to have something in common. They all concentrate on 'terrain features', ie. unusual terrain - things that hinder movement, block line of sight and have an impact on the game.
What tends to get ignored is all the rest of the table, which for a lot of games, especially ancients or Napoleonic say, is just 'plain', ie. does not affect the game in any way.
Now, hang on, you might say, if you start making this sort of terrain, aren't you back to 'Terrain boards' all over again. To which my answer is 'not necessarily'. At least not the sort of boards that cover the whole table. Why not just have a few decent sized (say two foot square, or two by three) either regular or irregular shapes cut from MDF and 'terrained', ie. crafted from sand, often painted and drybrushed, and enhanced with scatter etc. to represent fields, or areas of rough meadow or pasture, or formal garden, or sandy ground, or moorland, or bare rock (eg. for Sci-Fi) or shell-hole blasted no-mans land or snow or frozen lake...or whatever, as the sort of 'plain' terrain you are likely to encounter on your battlefield... just to 'throw down' as you do for actual 'features'?
Well that's the 'concept'. I've managed to get a nice 4mm MDF board at Wicks and dried out a heap of rough sand. So as soon as I get the jig saw out I'll be sharing the results...
Friday, 3 February 2012
Catching up on things done in 2011: Jungle Terrain
Having to move house again in the autumn, I realised that I seemed to have even more boxes of 'stuff' hanging around, acquired, scounged or saved to 'make' things than I had figures! This included a lot of things for making terrain, including some acquarium plants for making up some jungle terrain. I'm quite close to finishing both Japanese and Australian/Commonwealth armies for Rapid Fire/Cross Fire (and also have US Marines too) and also acquired the old Esci Vietnam War figures (now Revell and Italeri re-issues) last year, plus I'm hoping to make getting all my Darkest Africa stuff my 'big project' for this year. All need plenty of jungle, so among the things I decided to try and 'blitz' ahead of my house move was the jungle.I had a sheet of 4mm MDF and got to work with a jigsaw cutting out lots of shapes for this and other stuff, plastered them with a generous amount of PVA glue and then my trusty rough sand, and using a variety of acquarium plants acquired from Pets at Home got sticking them on with a hot glue gun. I've finished some off with a few twigs to represent fallen logs and some tea leaves - dried out again or not used in the first place, which was a tip I picked up on another blog and makes passable leaf litter. Both regular brown and green Chinese tea works well for this, and I used a combination of both.
I started with large 'stands' which are handy for putting down a couple to represent a reasonable sized area, but I also went on to try out basing them on some smaller bases and even coins. I found a variety of different sizes bases worked well for covering a bigger area. As the top photo shows a single A4 box when closely packed for storage can be spread out to cover about 4 feet by 2 feet and still look like dense jungle. It also looks even better when you add add palm trees (more 'island look') or just normal model trees (more 'rainforesty look') or both - sorry I didn't have these to hand when I took these shots-and doing so also increases the table coverage you can get from this much jungle.
In the event I probably only got half or less of what I wanted to get done completed, but this was largely down to running out of storage boxes which I thought I'd ordered in generous enough quantities but obviously not! I've got plenty more plants and have done another tray of bases already so, I can whip up some more when I've got more storage boxes.
Labels:
Darkest Africa,
Jungle terrain,
Terrain,
WW2 Japanese
Tuesday, 2 August 2011
DBA Towns/Cities (aka BUAs)
Steve asked me what I've got in the way of 'BUAs' for DBA. (I personally hate this particularly piece of DBA jargon - why don't the rule writers call them Towns/Cities? The term 'Built-Up Area or the achronymn BUA, is anachronistic and ugly!). Well this was a piece of inspiration for some very cheap terain, that I got when just about to throw away some PC packing. Took me about 10 minutes and I think they have a passing resemblence to a mudbrick town, probably more suitable for chariot period than 'classical'.
I keep meaning to do something a bit better (not difficult!), probably starting with a city wall made from cork tile -probably with somewhere to stand troops on - and moving on to something more mediterranean in the way of a group of buildings to go in it.
Haven't got around to it yet, so it's still these boys for now! At least they stack one inside the other, are light and I'd not cry if something happened to them.
Subscribe to:
Posts (Atom)


