Friday, 6 December 2019
Back...after a fairly long interruption!
As the last entry on this blog was dated March 2014 and it is today December 2019, it is a bit of an understatement to say I have been a bit inactive on the wargaming blogging front to date.
A number of factors contributed to this, not least personal circumstances which have meant I have not done much wargaming although I have done a lot of painting. This has included moving out of the scale featured in most of this blog to date, ie. 20mm, mainly into 28mm with a couple of projects in 15mm.
I also realised back in 2014 that neither my camera nor photography skills matched a lot of other blogs out there, though my intentions with this blog have never been to attract wide audience but essentially for the narrower purpose of having a handy reference for my potential wargaming opponents and myself of forces available for games.
It is in that spirit I am resuming it, mainly because I am trying to organise some sources for some games, which immediately are back in the old scale of 20mm...
Sunday, 16 March 2014
Land of Milk and Honey - Hostage Rescue in the Lebannon
This was my second game with David's monthly Sunday gaming group, although David couldn't make it. It was based in Lebannon in the 1980s. It started with a briefing aboard the USS Iwo Jima. The five players were commanders of five squads of troops, three of Navy Seals, one a CIA agent with CIA troops, and the other a local Christian Phalangite militia leader who the CIA had recruited. I took the role of Lt Commander Green a subordinate commander in charge of Blue Team, US Navy Seals. Our target was a town east of Beirut close to the Syrian border where it was believed several US hostages had been moved to and were shortly to be taken in a convoy across the border. Our main target was a CIA station chief, who we were told if he could not be extracted "was not to be left alive in enemy hands". The main forces were Islamic Jihad and Hezzbollah forces, but crack Iranian Revolutionary Guards were also in the area. We had to choose our equipment and plan an attack. In the course of doing so the CIA agent received intel that a convoy of Syrian army vehicles were heading for the town.
We decided to start by dropping the team of Christian Militia at 0200 hours in the hills north of the town to infiltrate the town. They were given call signs to report back. Our main targets we chose as three buildings east of the town, where we thought the hostages most likely to be located, which would also help us seal off the town should a convoy attempt to make a break for the border. Intel indicated that the local forces had anti-aircraft capability so we decided to send in two 'Littlebird'; attack helicopters to clear an AA guns off our two main target buildings. Then we would send two Blackhawk's and a Seahawk to land the Seal and CIA teams on the roofs of our target buildings, with a plan to extract from an LZ at the north-east corner of the board. Red Team led by the Seal Commander would take most of the extra equipment. Blue Team and the CIA Team would have to share a chopper. Gold Team was to take a building on the other side of the street.
We were all sent out of the room (thanks to a skylight we could see the table from an upstairs room) except for the Militia leader. (We were subsequently told that the infiltration and reconnaissance went far from smoothly running into several groups who fired on them and blocked their entrance to the town, but they did get into position to help Red Team). We got our call sign and all went back again to 'saddle up' for our pre-dawn attack.
From here on in I'll let the pictures tell the story:
The result was pretty disastrous. We got three hostages out but not the main target, who the Red Team commander said was dead when they found him, but he later told us had been killed in the assault. But otherwise we were slaughtered, and I was told that my two Navy Seals who had jumped aboard the helicopters had committed a grievous breach of the Seal code in leaving two men behind, and could be expected to kicked out of the unit!
Umpire John, subsequently explained to us that our game was based on an actual mission to save CIA station chief William Buckley, which was judged too risky and aborted. Buckley died under torture, and the other hostages eventually released several years later.
Overall a brilliant and exciting game which conjured up the images of a thousand action movies!
Rules were John's own "Guts enough to try!" The board was subtly marked in 'squares' with palm trees. You could move one square and make an action, or move two squares - which is why our pursuers were all over us. Navy Seals got to hit on 4,5,6, had a saving throw from their Kevlar armour and it took one hit to wound, which could be treated by a medic with a med pack. Extra firing dice could be added by using up an ammo belt for the M60 MG, and other equipment included stun genades - which is effective meant the opposition couldn't return fire that round - demolition charges and one-shot LAWs. The opposition varied in their score to hit, although the rather nasty Iranian Revolutionary Guard had the same chances as us, so I'm pretty glad I took them out either with stun grenades or on the first round of assault. .
Thanks to all for inviting me along, and especially a very, very big thanks to John for such a huge amount of preparation and bringing all the toys!
We decided to start by dropping the team of Christian Militia at 0200 hours in the hills north of the town to infiltrate the town. They were given call signs to report back. Our main targets we chose as three buildings east of the town, where we thought the hostages most likely to be located, which would also help us seal off the town should a convoy attempt to make a break for the border. Intel indicated that the local forces had anti-aircraft capability so we decided to send in two 'Littlebird'; attack helicopters to clear an AA guns off our two main target buildings. Then we would send two Blackhawk's and a Seahawk to land the Seal and CIA teams on the roofs of our target buildings, with a plan to extract from an LZ at the north-east corner of the board. Red Team led by the Seal Commander would take most of the extra equipment. Blue Team and the CIA Team would have to share a chopper. Gold Team was to take a building on the other side of the street.
We were all sent out of the room (thanks to a skylight we could see the table from an upstairs room) except for the Militia leader. (We were subsequently told that the infiltration and reconnaissance went far from smoothly running into several groups who fired on them and blocked their entrance to the town, but they did get into position to help Red Team). We got our call sign and all went back again to 'saddle up' for our pre-dawn attack.
From here on in I'll let the pictures tell the story:
 |
| A town on the Syrian border...Phalangite Christian Militia scout out the opposition... |
 |
| Dropped in the hills to the East Phalangite Militia recce the area |
 |
| Attack helicopters empty their ammunition load strafing the two target rooftops |
 |
| View of the town |
 |
| We can now see a number of vehicles have arrived in the town since yesterday... |
 |
| ....Syrian armour units have arrived overnight |
 |
| ...the attack helicopters hit and destroy an AA gun on one roof... |
 |
| ....and damage another on the other... |
 |
| ....but take fire from a third AA gun on another roof |
 |
| The 'hawks move in to drop the Navy Seal Teams |
 |
| Loaded with two teams and too dangerous to carry out the plan of dropping us on the roof of our target building my Blackhawk dips behind a building and unloads my Seal Team and the CIA Team |
 |
| The attack helicopter circles over the remaining AA gun but pays the price and is shot down. My team is given the secondary objective of rescuing the crew |
 |
| Read Team is able to land on the roof of its target and disembark |
 |
| View from the west side of town |
 |
| On the East side of town Gold Team take out another rooftop gun |
 |
| But soon they have to contend with a swarm of attackers coming up the stairs |
 |
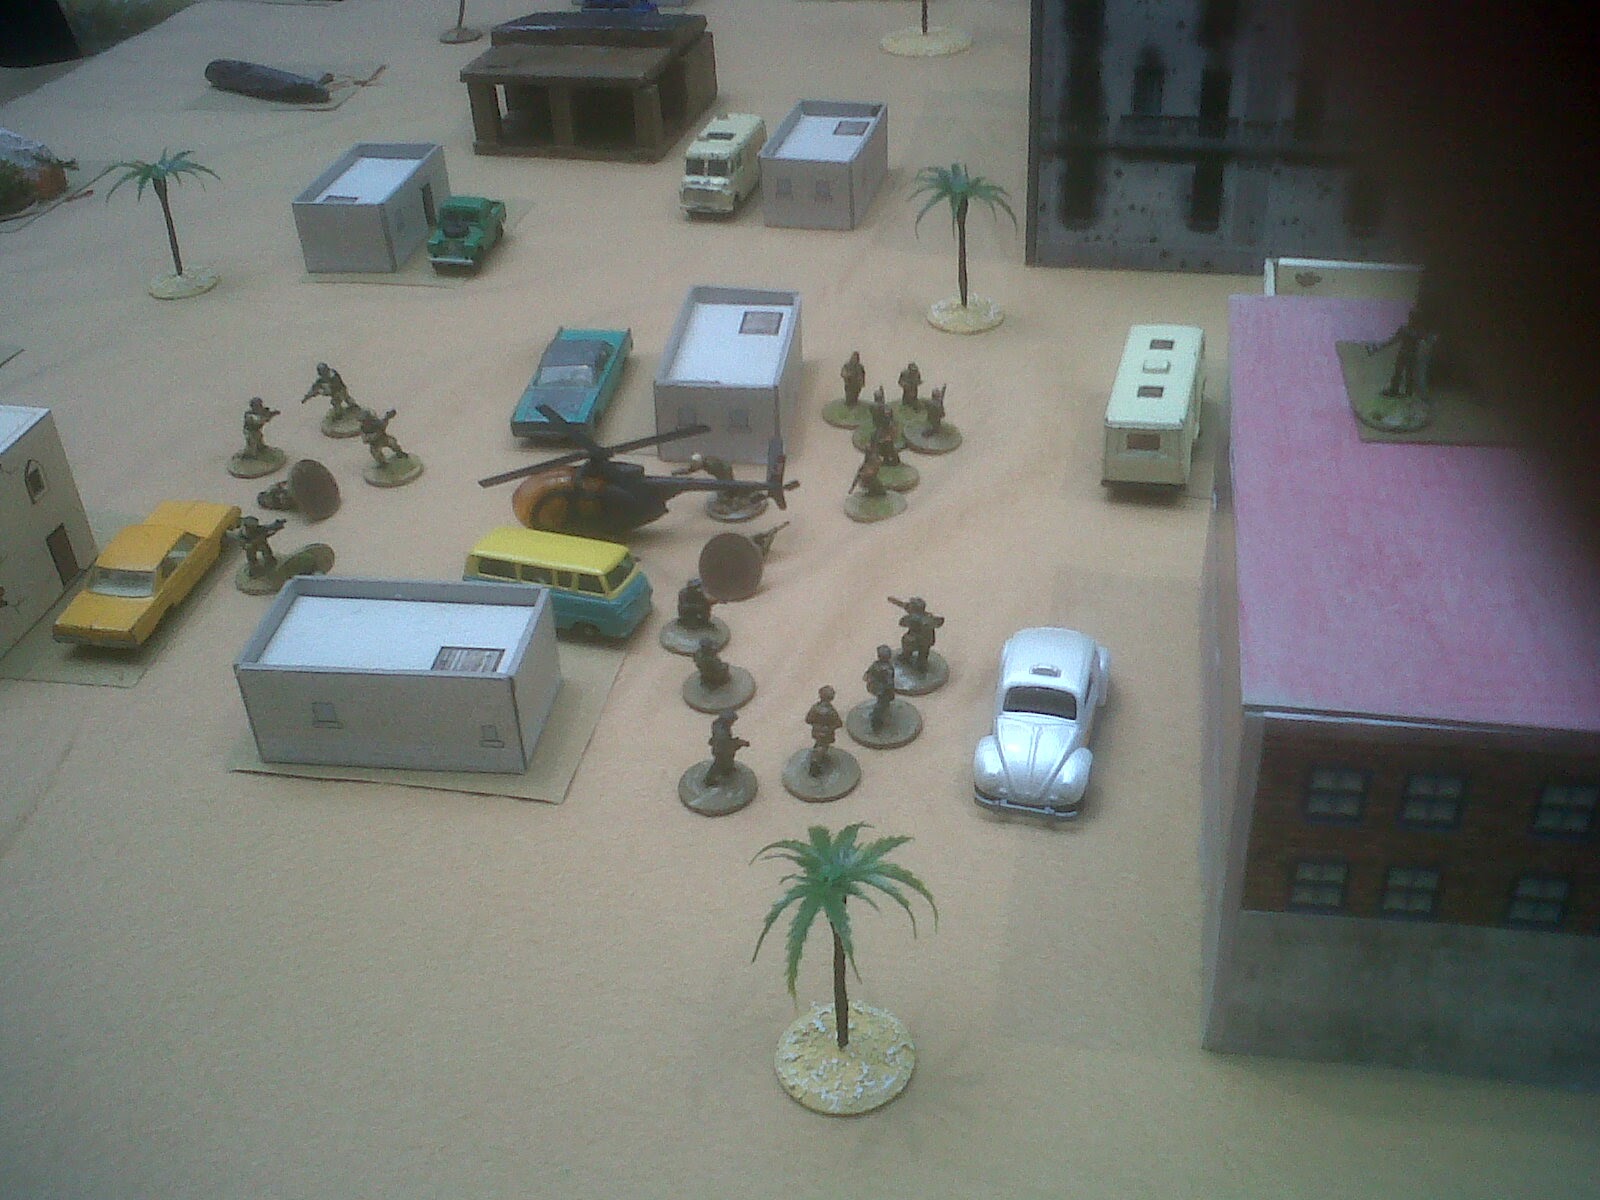
| A close up of my team (Blue team) and the CIA team on the ground |
 |
| Red Team also has company and let's them have a couple of belts of M60 ammunition...but find that their hostage, our main target a CIA Station chief , is already dead... |
 |
| Blue Team (my team) come under fire from a shack and Lt Commander Green (ie. me!) is hit and wounded! |
 |
| While Blue Team medic patches me up the CIA Team and mine pour fire into the shack |
 |
| The CIATeam storm into the building but everyone in there is already dead |
 |
| Meanwhile the Syrian armour surround the building which Gold Team has captured where they have found a hostage |
 |
| Meanwhile my (Blue) Team prepare to assault their own target building. They throw in stun grenades and pour in fire...deadly accurate fire as it turns out! |
 |
| They storm in killing everyone left inside and rescuing another hostage....but one of the team is wounded |
 |
| The CIA Team move in to rescue the Littlebird crew... |
 |
| ....but some Islamic Jihadists have beat them to it... |
 |
| ...a firefight develops... |
 |
| Two in the CIA Team are wounded, and one is the medic! |
 |
| Gold Team is under siege |
 |
| More fighters join the fight with the CIA Team |
 |
| I leave my first target with the rescued hostage and race to join the CIA Team with my medic, although I'm out of medic packs and need to get to theirs |
 |
| Red Team and our Phalangite allies meanwhile have crossed the street to help Gold Team and encounter some opposition which they have little problem taking care of. Together they also take out the armoured cars and tank with a TOW and LAWs |
 |
| Blue Team and the CIA Team take out all the enemy fighters but the chopper crew have been killed |
 |
| My (Blue) Team assaults the building with the remaining AA gun on the roof. Again stun grenades are effective and they empty all their M60 ammo belts in a fierce assault |
 |
| ...but the building is swarming with Iranian Revolutionary guards, our toughest opponent I retreat out the building lopping in demolition charges hoping to destroy the whole building as I go, but both fail to detonate. I fire off two LAWs for good measure and damage but not destroy the AA gun on the roof |
 |
| Red Team, Gold Team and the Phalangites race back across the table to LZ Wall Street, the agreed extraction point |
 |
| But we have stirred up a hornet's nest, more fighters appear |
 |
| Red and Gold Team are hotly pursued |
 |
| Although out of M60 ammo belts we decide we must take down the AA gun if we want to bring the choppers down safely for extraction. There is nothing for it but for Blue Team and the CIA Team to assault the building held by the Iranian guard again. Fortunately my teams marksmanship is again spot on! |
 |
| This time we storm the building, kill all the Iranian guards and take out the AA gun. For good measure we also rescue another hostage |
 |
| But the Bekka Valley is now pouring out fighters |
 |
| Red Team and Gold Team bring in a BlackHawk and load their hostage...but are engaged in a close firefight with more fighters rushing to join the fight |
 |
| ...and yet more appear on our front |
 |
| Red Team leader is scared to bring the second chopper down because of the risk of small arms fire |
 |
| We leave the building and make a run for it, but several of the CIA team go down including the main agent and the medic is killed and his medic pack is lost with him |
 |
| Yet more fighters join the fray |
 |
| The Seals of Blue Team drag the wounded CIA men back to some cover...unable to reach the main extraction point we call in a chopper.to a new location.. I'd wanted to call it a turn earlier...but it got forgotten in the confusion....and what's more there are too many of us for one bird... |
 |
| A fierce firefight develops around the main extraction point, a 'hawk giving covering fire but it judged too dangerous to land, both Red Team Leader and the leader of the Militia are killed. |
 |
| Meanwhile Blue Team and the CIA Team have a tense time waiting for our chopper |
 |
| Finally the chopper arrives but by now we are swamped |
 |
| I bring down the Blackhawk and load two rescued hostages on board, two Navy Seals jump on board with them |
 |
| The bird takes off but two wounded Seals are left behind wounded including the brave team-leader Lt Commander Green |
 |
| And there it ends...something of a bloody mess of an operation....two Seals from Blue Team captured, the CIA Team all shot and killed, Red Team and the Phalangites fighting to the bitter end and despite the first attack helicopter returning re-armed to strafe their opponents they were heavily outnumbered and all fell... |
The result was pretty disastrous. We got three hostages out but not the main target, who the Red Team commander said was dead when they found him, but he later told us had been killed in the assault. But otherwise we were slaughtered, and I was told that my two Navy Seals who had jumped aboard the helicopters had committed a grievous breach of the Seal code in leaving two men behind, and could be expected to kicked out of the unit!
Umpire John, subsequently explained to us that our game was based on an actual mission to save CIA station chief William Buckley, which was judged too risky and aborted. Buckley died under torture, and the other hostages eventually released several years later.
Overall a brilliant and exciting game which conjured up the images of a thousand action movies!
Rules were John's own "Guts enough to try!" The board was subtly marked in 'squares' with palm trees. You could move one square and make an action, or move two squares - which is why our pursuers were all over us. Navy Seals got to hit on 4,5,6, had a saving throw from their Kevlar armour and it took one hit to wound, which could be treated by a medic with a med pack. Extra firing dice could be added by using up an ammo belt for the M60 MG, and other equipment included stun genades - which is effective meant the opposition couldn't return fire that round - demolition charges and one-shot LAWs. The opposition varied in their score to hit, although the rather nasty Iranian Revolutionary Guard had the same chances as us, so I'm pretty glad I took them out either with stun grenades or on the first round of assault. .
Thanks to all for inviting me along, and especially a very, very big thanks to John for such a huge amount of preparation and bringing all the toys!
Subscribe to:
Posts (Atom)