Showing posts with label WAB. Show all posts

Wednesday, 8 February 2012

WAB Battle - Anglo-Saxons vs Vikings

Overview of the battlefield showing my forces advancing on the left
I have to confess that within my group within our club's annual 'Winter King' Tournament, that the one army I was rather fearful of meeting in combat was the Vikings. The previous year I'd seen Phil's Anglo-Saxon army make a very successful outflanking maneuver against a Viking army, only for one of its units on the other flank to fail its 'Fear of the Vikings' test, at which point two other units including the Cyning's (King's) bodyguard also failed their panic tests and legged it! Only one of my units (the huscarles) had a high enough 'core' morale to be immune to this test, the rest were all susceptible to running like rabbits at the sight of charging elite Viking troops.

My battle plan was to set most of my army in an echelon formation with a refused right flank, and my huscarles leading the assault on the left, supported by a small 24 figure unit of thegns/coerls in march formation ready to make a rapid march up the left flank and outflank the Vikings on that side. On my right centre I also had a hill, and my plan was to leave one of my units there which they could defend in shieldwall, defence being a forte of the Anglo-Saxon army. Across the table, my opponent Ginge fielded an army borrowed and designed by Reece, our reigning club champion, infamous for his devilish mastery of the subtleties of the WAB army lists. There were several units I didn't recognise, including a small little unit which turned out to be Jomsvikings facing my left flank and a unit which I thought were skirmishers on my right flank, which turned out to be super-hard Gestir warriors in light infantry formation.

Ginge advanced most of his line against me, except for the Jomsvikings on my far left, which he held back not wanted to get caught by my outflanking manuever, screened by archers. I advanced only on my left. On my right flank the Gestir light infantry swept through some woods and straight at my refused Abbod's unit on my far left, my slingers taking out a couple of figures as they came on. Otherwise (as usual it would seem) I lost the tussle between skirmishers, with my screening force of slingers being send packing by his archers. It was fairly clear that I couldn't get past these archers on my left unless I charged them, which I used the flanking unit to turn and do. This scattered them, but I had to 'back up' this unit because it was in the way of my huscarles getting to grips with his Jomsvikings.

Meanwhile on my right, the Gestir were in range of my refused Abbod's unit and charged. As it happened, however, the Gestir were strung out and only half the unit were close enough to make contact. This proved highly advantageous, as I was defending with two ranks. Ginge fortunately rolled poorly, too, which was lucky as his Gestir could have been lethal. Instead I slaughtered most of those making contact, sent them running and ran them down!

A Bondi unit was following on aiming straight at my Abbod's unit so I threw caution to the wind and advanced to provoke a charge too . Here's a shot of them making contact:
Flushed with success against the Gestir, my Abbod's unit takes on the Bondi
 On my left my huscarles were still some way from the Jomsvikings, but a unit of hirdmen charged into a unit of thegns and coerls to the right of my Cyning's huscarles. Fortunately they survived both the 'Fear of the Vikings' test and the first round of combat.All three pictures on this page were taken at this stage of the battle.
My thegn and coerl unit on the right of my Cyning's Huscarles stands firm n the face of charging Viking Hirdmen
The next round, Ginge threw his Jomsvikings into the fray against my huscarles. His Jarl (king) and hirdmen were still steadily advancing towards my unit who refused to move from their hill.

The long and the short of it is that all three of the key combats went my way, with the thegn/coerl units being able to fight in two ranks in the second round of combat (when the Vikings with throwing weapons were down to one) proving key. The Abbod's unit broke the Bondi, I think in the first round of combat, while the small unit of Jomsvikings was virtually slaughtered by my double-handed axe wielding huscarles, Cyning and army standard after a couple of rounds of combat. My solid 32 fig unit of thegns and coerls on the right of the Cyning proved their worth in second and third rounds of combat against the hirdsmen, not able to stand taking two hits for every one they struck, and broke too.

Only the Jarl's hirdsmen were left standing. Even my slingers rallied and his skirmishers kept running, so having taken out five Viking units, without losing a single one of mine, there was no question of the result!

Reece turned up at the end to berate Ginge on some of his tactical errors with 'his' army, especially the over-hasty attack with his Gestir. As Tony, the only player in my group who had beaten me, lost two of his other battles, this left me top of my tournament group and clear to the next round. Unfortunately ructions at the club meant us wargamers decamping to a new venue and the tournament was cancelled. Eager as I was for more 'blood' I could at least count my first WAB tournament a success, and hope to repeat the performance next time, for which I'll probably have to master the 'War and Conquest' rules which are fast over-taking WAB in popularity at the club for popularity.

Tuesday, 7 February 2012

WAB Battles - Second outing Anglo-Saxons vs Anglo-Saxons

View from my side of the table. Ross's skirmishers fleeing charge by unit on my left and Cyning leading his huscarles into combat in the centre. Abbod's unit tormented by archers on the right flank
This was only my second ever game of Warhammer Ancient Battles, and after the kicking my Anglo-Saxons took from the Late Romans in my first game (for which mercifully no pictures survive!) I was beginning to wonder if I could expect a 'long apprenticeship' of humiliating defeats before I got the hang of it.

My second outing in our 'Winter King' tournament was against Ross, who also fielded an Anglo-Saxon army. Anglo-Saxon armies with their long thrusting spears and shieldwall tactics are better at defending than attacking, so I chose to put my 'Cyning' (King) and army standard bearer with my huscarles armed with double-handed axes to give me a 'rock hard' unit that could attack. Otherwise I took 4 units of mixed thegns/coerls, two 32 figure units, two 24 fig and some slingers. Ross equipped his Cyning's unit with huscarles, thegns and coerls (not entirely legally but a genuine mistake in reading the army lists), took a unit of pure thegns and two of thegns/coerls, plus slingers and archers. Phil set up terrain, which initially did not seem to favour me, as dense terrain on one flank meant I couldn't exploit having one more unit and took a while to clear a hedge in my front. I lost my skirmishers early on, charged by his slingers. I charged them back with a 24 fig thegn/coerl unit on my left flank, sending them firing and fleeing. In the centre I advanced my Cyning and Huscarles in echelon formation and charged a unit  of thegns/coerls. On the right I advanced my thegn/coerl unit led by my Abbod, but Ross held his unit back and harassed me with archers. The top picture shows the battle at this stage from my side of the table, and the pic below shows the view from Ross's side of the table.
View from Ross's side of the table. Unit on the left are facing down my Abbod. Unit on far right is his thegn unit who were shortly to demolish my 24 fig thegn/coerls when they exposed a flank by charging the slingers again
 Ross's thegn unit is on the right of the shot above, his Cyning's unit is in the centre as yet unengaged.
Close up of same scene. Huscarle's getting stuck in and a bit of a traffic jam on my left with two units 'stacked' one behind the other
 My huscarles started to efficiently demolish the thegn/coerl unit to their front, but at this point I made two 'unforced errors'. The first was to decide to charge the slingers again. The idea was to move my 24 fig thegn/ceorl unit clear of the unit behind to let them advance and engage Ross's thegns, while leaving the first unit positioned to swing around to make a rear attack on his centre. This proved dumb, as a failed charge was inevitable, and I simply left an exposed flank for his thegn unit to charge. The second error was to allow a gap to open in my echeleon formation such that Ross had enough space swing his Cyning unit into the flank of my Huscarles. He risked exposing the flank of his Cyning's unit, but it could be battle winning move.
Close up of my Abbod's unit getting harrassed by skirmishing archers as Ross's formed unit holds back
 On my right flank, the pinpick of archers was getting annoying so I decided to charge in even though this meant in the first round I would fight one rank vs two, albeit if my Abbod gave the unit a re-roll on misses.
Ross's thegn unit on the left having smashed my 24 fig thegn/ceorls, would have made a follow-on charge into the flank of my huscarles (as positioned here) if the huscarles had not won their combat and moved clear in their pursuit. Ross's Cyning's unit on the right which appears in a similar position to the previous shot has, in fact, been very busy, having flank charged my huscarles, taken a flank charge from my unit, and managed to outrun them and rally!
In the event Ross's gamble didn't come off. He rolled absymally with his Cyning unit vs my huscarles, and my other unit was able to flank charge him, a combat he lost but survived the pursuit and rallied. My 24 fig thegn/coerl unit on the left were completely destroyed by a flank charge from Ross's thegn unit, who threatened to run into the flank of my huscarles. Fortunately my huscarles broke the thegn/coerl unit to their front and ran them down in the pursuit. This meant they advanced clear of the thegns path, so they couldn't charge on into their flank (as per photo above), but instead ran on into my 32 fig thegn/ceorl unit behind the 24 fig unit that they had destroyed (as per photo below). The combat on the right continued for several turns (unit near baseline are destroyed 24 fig unit from my left flank and not in the battle).
On the far left, because they would have failed to contact my huscarles in fact Ross's thegn's follow on charge took them into my 32 fig thegn/coerl unit. This proved a great result for me! On the right my Abbod's unit has charged in (unit bottom right has been destroyed and taken out of play)
 I had planned for my huscarles to win this battle for me in the centre, but in the event it was decided on the flanks. Ross's over-run charge by his thegns on my left proved disasterous. He (attacking with just one rank) rolled poorly, while hitting back with the (two) front ranks of thegns I inflicted several hits, broke the unit and ran them down in the pursuit.

On the right my Abbod's unit was also victorious, breaking their opponents. Although they didn't run them down in the pursuit, only Ross's Cyning unit was standing. He'd put four formed units on the table, seen two destroyed, one was running and his Cyning was surrounded on all sides. I'd fielded five formed units, seen one destroyed but had four in fighting conditon. Ross could have broken my centre with his risky flank attack on my huscarles, but the gamble hadn't come off, and I was very pleased to have won my first ever WAB victory!!!

Friday, 3 February 2012

Anglo-Saxon Army for Warhammer Ancient Battles

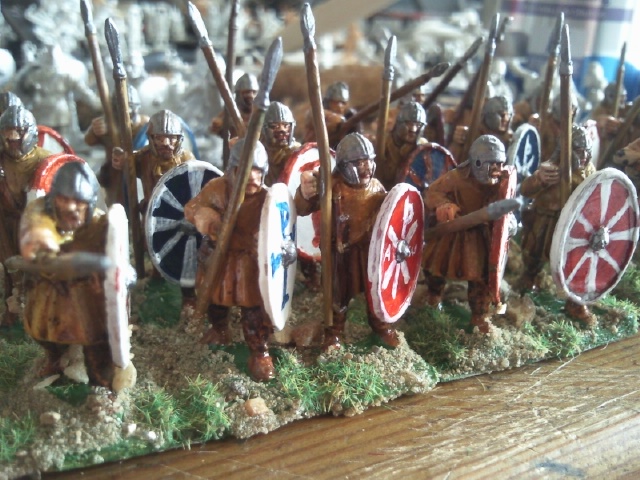
This army started as stock for my now defunct on-line model shop. They are excellent Renegade Miniatures figures, and I'd simply bought two packs of each set in the range to have as stock, rather than planning what I needed for an army. I just happened not to have put them into storage when I wound up the shop, as they were not a big range.

I had planned to field a Romano-British army for the annual 'Winter King' Warhammer Ancient Battles tournament that my new club has every year, but although I had three units painted and some more to paint, I realised that I was quite a bit short of a full army and would need to lay out around £150 for more figures. This was not at a time a tempting prospect and my first thought was to 'cheat' by painting up some of these figs as Romano-British. In the process, I counted up all the figures I had, compared it to the 'Shieldwall' supplement and realised I had virtually the perfect number for a full Middle to Late Anglo-Saxon Army!

So a week or so into December, I thought I'd throw caution to the wind and see if I could paint this army up. The problem was I had to get them done by mid-January!

It certainly was a real push and at several points I thought I wouldn't make it. Fortunately most people were slow in starting their first battles for the competition, so I kept my head down and kept painting...and by the end of January...I was close enough to take a chance and book a game for the next week...though I was sweating right up to the a couple of hours before the game on varnish and basing glue drying...only to find my opponent turned up, but the army he was hoping to borrow didn't!


Still everything done, I set a date for a battle for the next week. All told I have a unit of 24 Huscarles armed with two-handed battle axe - using this makes it a later Anglo-Danish army- and enough painted for 4/5 units of thegnsand coerls (depending on whether I make them 24 or 32 figure units), plus 34 'gebur' skirmishers. The unit above is the one I use for the Cyning's own unit.

Here's a close up of the figure I'm using for now as my Cyning (King), but he may get displaced by a 'Gripping Beast' King Alfred figure once I'm happy with the paint job.

I've also got another 30 or so more thegns and coerls left to even start painting, and 30 odd more unarmoured earlier period 'West Wind' Saxons, which can easily be used as coerls. Once I've don't these I can field the army as a Middle-period (ie. 8-9th century) Anglo-Saxon army- and to be honest could be used for earlier too- up to 2200 points.

I didn't get time to buy the excellent 'Little Big Man Studio' flags before putting them in the field (I have since), but fitted them out with a few 'print offs' of them - complete with 'spoiler' green lines, just to get the size of their flagpoles right. This is one unit equipped with their large cross flag.

The army list lets you field an 'Abbod', well worth having as a unit so equipped gets to re-roll all its misses in the first round of combat. I couldn't find a figure I like for this, looking and failing to find something 'Dark Age' but 'Clerical' in my Fantasy figure collection. But I did have a 'Gripping Beast' unarmoured priest, which with a cardboard cross on stick became my standard bearer.

These are my Huscarles, which by rights should be the bodyguard for my Cyning in a later period army, but one of the big weaknesses of an Anglo-Saxon army is that the thegns have pretty poor morale (just 6) so need as many characters as you can afford to lead them. The Huscarles have a morale of 9, so as 'Winter King' tournament rules limit armies to 1850 points if you use more than 4 characters, it is a bit of a waste of your Cyning to have him lead the Huscarles when you need every character you can get.

Above is another mixed unit and below a separate shot of some Coerls who aren't very visible in the other shots as they found up behind the thegns in these mixed units.

I was hoping for an easy first outing against Tony's Picts. Tony is a very experienced WAB player (and I'm not, in fact although I'd had the rules for ages and read them many times, at my former club no one was into WAB so this was my FIRST game), but Anglo-Saxon thegn-led units should go through Picts like a knife through butter.


Unfortunately, Tony has decided not to use his exquisitely painted Pictish army and painted up a Late Roman Army instead. Anglo-Saxons are mainly armed with thrusting spear, not good in the first round of combat if they charge, but great if they can survive the first round of combat. Tony had armed all his Late Roman's with heavy throwing spear, which maximises his deadliness in the first round of combat-especially deadly when given to his 'warband' allies which will break any enemy they charge if they win in the first round....


...the result? Three of my five heavy units broken in the first turn of combat, at which point my general's unit rolls at 11 for a panic test (they had won their combat and only needed at roll 9 or less!). So all my army except the Huscarles-who didn't even get into combat-were running and game over!


And it was not much consolation to follow Tony's suggestion and -just for fun!?!-test to see if they would rally next turn -and find three of the units would have!


Still, I don't think I really did anything much right in the game, so there you are! Let's hope for better luck next time!

Catching up on things completed in 2011: Arthurian British

These are a couple of units that I got finished around June/July time, They have been kicking around for a some time and are Gripping Beast Romano-British figures. I've always loved the Arthurian age and it seemed a period I could only do justice to with 28mm figures.

The unit at the top are 'helmeted' auxiliaries to uses as 'milites', of which more later. The first units to show off, though are bare-headed types.


This is a unit of 'Pedyts', the term given in the Warhammer Ancient Battles 'Age of Arthur' supplement to the 'levy' type infantry that it is assumed that the British had to fall back on after the Legions departed. Warhammer is copying DBA in this useage, and both sets of rules like many wargamers like to identify 'troop types' when in fact, 'pedyts' is fairly obviously just a corruption of 'pedites', which just means foot soldiers, but there you go...


I need to give the standard bearer a standard but otherwise this unit is completed.


I had thought I might have to buy shield transfers, but instead had a crack at hand-painting them following the transfer designs. They might look a little crude in extreme close-ups like this, but on the table, they look pretty decent to me.


Next up are some more shots of the unit of 'milities' shown at the top of this post. 'Milites' is the Roman word for 'soldiers', and in WAB 'Age of Arthur' supplement is for term for better trained troops found mainly in the 'Civitas' (ie. highly Romanised states self-governing areas around important Roman cities in lowland England shortly after Imperial central authority was lost) armies. Again any differentiation of troop types in this era is short on any real evidence and long on conjecture.

Again, I've hand painted shields and I'm generally pretty happy with them. I don't have a command element painted up yet. I will probably buy some late Roman figures for this.

Another close-up. I am actually not sure that Gripping Beast figures actually look the best on the table, but they sure do photograph well!

Next are some Saxons, in fact, 'Gripping Beasts' 'Germanic warriors'. They have subsequently produced some more figures with smaller 'buckler' shields for this earlier period. Although I'm not familiar with the archeological evidence as such, wargamers are often keen to 'over-interprete' what is often scanty evidence, and determining the size of a shield from what will be the faintest trace of the long decayed wood and leather - only metal shield bosses generally survive-can often be misleading, so I'm not inclined to get too worked up about this.
Saxons were initially mercenary auxiliaries, but then revolted so you can have these within the Romano-British army or as an enemy. I have some armoured figures I can use as command figures or as a separate unit.

Another close-up, again shields are hand-painted, as unfortunately a few make obvious!...


I had planned to use this army for my 'new' club's 'Winter King' tournament, but I actually bought this little force before the Warhammer rules, much less the army lists had been published. Initially I just bought enough for some DBA armies, but decided they looked too small and having 3/4 figure elements didn't look right - in fact I've since seen people who use 28mm for DBA generally use bigger element bases with more figures on.


In any case, I think WAB is probably a better rule set for this period, as its 'characters', essentially 'heroes', fit in better with the smaller scale of Dark Age warfare and its semi-mythic quality.


I subsequently bought some more figures, but not having an army list or much idea the sort of point values of armies people generally used, I did not really buy enough. Left to paint I still have a (small) Armoured Comitatus force on foot, an understrength 16 man 'shieldwall' of Late Roman figures, and quite a few cavalry of different types (Arthurian, Late Roman and Pictish). Unfortunately, you can't really field the armoured 'Comitatus' on foot and mounted in the same army, 16 figs is too small for a viable WAB heavy infantry unit, and I could make the points value for the tournament, but only making at least half my army cavalry, which is probably not a winning combination under WAB rules.


Realistically, I concluded I'd need to buy at least another £150 worth of figures to get this army into shape, and this was at a time when funds were tight, and I happened to unearth in a box a stash of Anglo-Saxon figures I already had which turned out to be the exact number for a full WAB 2000 point plus army, so.....